(re-published from June 23, 2010)
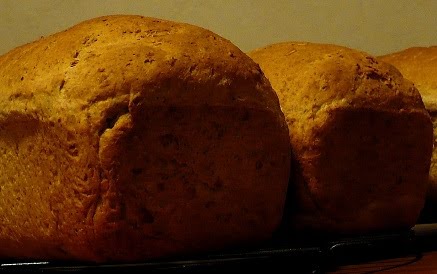
Aside from occasional sandwich rolls and sourdough baguettes, this is our household bread. I make it approximately once a week, and Sean helps punch the dough. In fact, we're due for another batch! Pardon the horrible quality of the photos...
This whole grain bread fulfills my Hubby's one request: it's squishy. It's sturdy enough for sandwiches too! This dough rises three times. I inherited this practice from my mom, who believes (and I agree) that the extra rising helps bread to last longer without going stale.
 Turn on your oven light. This will gently warm your oven to the perfect temperature for raising the bead dough. However, it takes a bit of time, so turn on your light now. If it's quite warm in your house (80s or warmer), then don't bother with this step. Instead you'll raise the dough on your counter.
In a small saucepan, begin gently warming 2 cups of milk (half&half or whole milk are ideal, though 2% works also. I can't speak for lesser fat varieties, so you'd have to experiment). If your milk is already pasteurized, then don't bother fully scalding the milk. For this step, you're just getting it hot enough to pour over oatmeal to soften the grain and melt butter.
In a heat-tolerant bowl, combine:
Once the milk is hot and steamy, pour it over the oat mixture. Stir, and set aside (stirring it around now and then, especially when you're bored). This is going to need to cool to less than 116 degrees, so that it doesn't kill the yeast. I aim for anywhere between 104 and 114 degrees.
In a glass measuring cup, combine 4 1/2 teaspoons of yeast in warm water (I use plain Red Star, and buy it at Costco. You may also use two packets of yeast instead). Set it aside to dissolve.
In a large medium-sized bowl, combine:
2 cups whole wheat flour (NOT pastry flour. I use Bob's Red Mill, organic whole wheat flour)
1/2 cup dark rye flour (If this isn't available, you may substitute more whole wheat, or another grain such as barley flour)
1/2 cup vital wheat gluten (hopefully available at your local store. If not, then go ahead and try it without)
Spoon about 1 1/2 cups of the flour mixture into a large bowl. Stir the yeast and water mixture, to make sure its fully dissolved. Pour the yeast mixture into the large bowl with the flour. Beat this with a wooden spoon for about 1 minute, then cover with a damp warm cloth.
Wait about 10 minutes. Sometimes I poke around at the oatmeal mixture, take its temperature now and then. Sometimes I check my email. And sometimes, I take longer than 10 minutes (which is technically a good thing for this stage, though I won't go into those technicalities). My point is that this is a very low stress recipe with lots of breaks.
After the 10 minutes has passed and the oatmeal mixture is between 104 and 114 degrees, add the oatmeal to the yeast-flour mixture. Beat the goop with your spoon. Once that is combined, add a couple large spoons-full (I use large serving spoons) of the flour mixture. Add little by little until it's still a little sticky, and yet you can kind of maneuver the dough into a ball and knead in the bowl for about a minute. This isn't exact, so don't worry if you didn't add enough flour yet. You can add more later, while you do the Big Knead. I always have about 1/2 cup of flour left over, which I save for future batches.
Cover the bowl with a damp warm cloth, and rest for another 10 minutes (or so).
Now is an ideal time to prepare your kneading surface. I have tiny tile counters, which means I knead at the kitchen table. I lay a large Silpat smooth-side down, and knead on that (a smaller Silpat would work also). However, I've kneaded straight on the table also (until Mumsy suggested that might eventually wear away at the surface... especially since I made bread so often). Just make sure your surface is smooth and can be floured. Oh yeah... go ahead lightly flour the surface (with the bread's flour mixture).
After the 10 (or so) minutes have passed, turn the dough out onto your happy kneading surface, and knead! Try to tolerate as much stickiness as possible, knowing that it will eventually turn to silky smoothness the longer you knead. However, if it's sticking all over your fingers, then sprinkle a little more flour. Sprinkle the flour as needed, until your hands are relatively dough-free whilst you knead. The key is time and patience. Whole grains absorb a lot of moisture when given enough time. Knead for about 10 minutes (no less than 10 minutes, though a couple minutes longer won't hurt).
When you're finished kneading, cover the dough ball with a damp cloth. Clean and lightly coat the large bowl with oil (I use Safflower oil. "Veggie" or sunflower oil will probably work fine. However, do not use canola oil... it soaks in and sticks!). Move the dough ball into the bowl, smooth-side down. Then turn it smooth-side up. It should now have a nice oily sheen from the bottom of the bowl. Ta-da!
Cover the bowl with a damp warm cloth, and place the dough in your semi-warm oven (or the counter, if your house is quite warm). Let this rise for about 1 hour, or until the dough appears doubled in bulk-size. If you live at a high altitude, this might take less time. Peek at it now and then, and don't fret! The bread won't fail merely because you aren't sure if it's quite doubled, or perhaps it's slightly more than doubled.
Once the dough has risen to double, take it out and punch it. Then punch it again. And again. You're trying to beat the air out, and return the dough close to the original size. After abusing it, take the dough out of the bowl and knead it for about 1 minute. You'll notice that the kneading surface doesn't require flour this time.
Return it to the bowl (don't bother greasing it again). Cover with the damp warm cloth, set it in the semi-warm oven, and let it rise again. This time it will take about half the time (these are rough estimates, don't worry if the timing is different from what I state here).
Whilst waiting, grease two loaf pans. When the dough is ready, abuse it again. Punch it, knead it, and get that air out! Cut the dough into two equal parts. Set one half aside, and roll the other half into a medium rectangle (about 2/3 the width of your loaf pan). Beginning at the narrow end, pinch and roll the dough into a loaf shape. You'll need to pinch the ends now and then also. Pinch the seam well. Give the ends a couple pats, and place the loaf in the pan. Repeat for the second loaf.
Cover the loaves with your damp warm cloth, and let them rise again. After about 20 or 30 minutes (or nearly doubled in size), remove the loaves from the oven (still covered with the cloth).
Preheat the oven to 350 degrees. Once it's preheated,uncover the loaves, and place them in the oven. Please don't bake your bread with the towels still on them. Please.
Bake for about 40 to 45 minutes. Remove from the oven. Turn the loaves out of the pans and onto cooling racks. Cool for about 10 or 15 minutes before cutting a steamy hot slice of bread... and smothering it in butter... perhaps honey butter... and jam... Mmmmm...
Since this has no preservatives, I store the bread in the refrigerator so that it lasts longer. However, I do store it in a plastic bread box for a day or so before refrigerating.
~Jenai
This whole grain bread fulfills my Hubby's one request: it's squishy. It's sturdy enough for sandwiches too! This dough rises three times. I inherited this practice from my mom, who believes (and I agree) that the extra rising helps bread to last longer without going stale.
Jenai's Honey Oaty Bread
In a small saucepan, begin gently warming 2 cups of milk (half&half or whole milk are ideal, though 2% works also. I can't speak for lesser fat varieties, so you'd have to experiment). If your milk is already pasteurized, then don't bother fully scalding the milk. For this step, you're just getting it hot enough to pour over oatmeal to soften the grain and melt butter.
In a heat-tolerant bowl, combine:
2 cups old fashioned oats
2 Tablespoons honey (I use raw honey, and therefore need the hot milk to melt it)
2 Tablespoons butter
1 1/2 teaspoons salt
Once the milk is hot and steamy, pour it over the oat mixture. Stir, and set aside (stirring it around now and then, especially when you're bored). This is going to need to cool to less than 116 degrees, so that it doesn't kill the yeast. I aim for anywhere between 104 and 114 degrees.
In a glass measuring cup, combine 4 1/2 teaspoons of yeast in warm water (I use plain Red Star, and buy it at Costco. You may also use two packets of yeast instead). Set it aside to dissolve.
In a large medium-sized bowl, combine:
2 cups whole wheat flour (NOT pastry flour. I use Bob's Red Mill, organic whole wheat flour)
1/2 cup dark rye flour (If this isn't available, you may substitute more whole wheat, or another grain such as barley flour)
1/2 cup vital wheat gluten (hopefully available at your local store. If not, then go ahead and try it without)
Spoon about 1 1/2 cups of the flour mixture into a large bowl. Stir the yeast and water mixture, to make sure its fully dissolved. Pour the yeast mixture into the large bowl with the flour. Beat this with a wooden spoon for about 1 minute, then cover with a damp warm cloth.
Wait about 10 minutes. Sometimes I poke around at the oatmeal mixture, take its temperature now and then. Sometimes I check my email. And sometimes, I take longer than 10 minutes (which is technically a good thing for this stage, though I won't go into those technicalities). My point is that this is a very low stress recipe with lots of breaks.
After the 10 minutes has passed and the oatmeal mixture is between 104 and 114 degrees, add the oatmeal to the yeast-flour mixture. Beat the goop with your spoon. Once that is combined, add a couple large spoons-full (I use large serving spoons) of the flour mixture. Add little by little until it's still a little sticky, and yet you can kind of maneuver the dough into a ball and knead in the bowl for about a minute. This isn't exact, so don't worry if you didn't add enough flour yet. You can add more later, while you do the Big Knead. I always have about 1/2 cup of flour left over, which I save for future batches.
Cover the bowl with a damp warm cloth, and rest for another 10 minutes (or so).
Now is an ideal time to prepare your kneading surface. I have tiny tile counters, which means I knead at the kitchen table. I lay a large Silpat smooth-side down, and knead on that (a smaller Silpat would work also). However, I've kneaded straight on the table also (until Mumsy suggested that might eventually wear away at the surface... especially since I made bread so often). Just make sure your surface is smooth and can be floured. Oh yeah... go ahead lightly flour the surface (with the bread's flour mixture).
After the 10 (or so) minutes have passed, turn the dough out onto your happy kneading surface, and knead! Try to tolerate as much stickiness as possible, knowing that it will eventually turn to silky smoothness the longer you knead. However, if it's sticking all over your fingers, then sprinkle a little more flour. Sprinkle the flour as needed, until your hands are relatively dough-free whilst you knead. The key is time and patience. Whole grains absorb a lot of moisture when given enough time. Knead for about 10 minutes (no less than 10 minutes, though a couple minutes longer won't hurt).
When you're finished kneading, cover the dough ball with a damp cloth. Clean and lightly coat the large bowl with oil (I use Safflower oil. "Veggie" or sunflower oil will probably work fine. However, do not use canola oil... it soaks in and sticks!). Move the dough ball into the bowl, smooth-side down. Then turn it smooth-side up. It should now have a nice oily sheen from the bottom of the bowl. Ta-da!
Cover the bowl with a damp warm cloth, and place the dough in your semi-warm oven (or the counter, if your house is quite warm). Let this rise for about 1 hour, or until the dough appears doubled in bulk-size. If you live at a high altitude, this might take less time. Peek at it now and then, and don't fret! The bread won't fail merely because you aren't sure if it's quite doubled, or perhaps it's slightly more than doubled.
Once the dough has risen to double, take it out and punch it. Then punch it again. And again. You're trying to beat the air out, and return the dough close to the original size. After abusing it, take the dough out of the bowl and knead it for about 1 minute. You'll notice that the kneading surface doesn't require flour this time.
Return it to the bowl (don't bother greasing it again). Cover with the damp warm cloth, set it in the semi-warm oven, and let it rise again. This time it will take about half the time (these are rough estimates, don't worry if the timing is different from what I state here).
Whilst waiting, grease two loaf pans. When the dough is ready, abuse it again. Punch it, knead it, and get that air out! Cut the dough into two equal parts. Set one half aside, and roll the other half into a medium rectangle (about 2/3 the width of your loaf pan). Beginning at the narrow end, pinch and roll the dough into a loaf shape. You'll need to pinch the ends now and then also. Pinch the seam well. Give the ends a couple pats, and place the loaf in the pan. Repeat for the second loaf.
Cover the loaves with your damp warm cloth, and let them rise again. After about 20 or 30 minutes (or nearly doubled in size), remove the loaves from the oven (still covered with the cloth).
Preheat the oven to 350 degrees. Once it's preheated,uncover the loaves, and place them in the oven. Please don't bake your bread with the towels still on them. Please.
Bake for about 40 to 45 minutes. Remove from the oven. Turn the loaves out of the pans and onto cooling racks. Cool for about 10 or 15 minutes before cutting a steamy hot slice of bread... and smothering it in butter... perhaps honey butter... and jam... Mmmmm...
Since this has no preservatives, I store the bread in the refrigerator so that it lasts longer. However, I do store it in a plastic bread box for a day or so before refrigerating.
~Jenai
No comments:
Post a Comment